Monochrome Wench

I'm a programming wench. This is my site.

Feb 012026
 

If you’ve cleared your secureboot keys in your UEFI setup and your motherboard firmware hasn’t been updated with the latest secureboot keys from Microsoft you may find your system is unable to boot to windows if you install the default secure boot keys in UEFI setup. The easiest solution to this problem is clear the secure boot keys so SecureBoot goes into setup mode and reinstall the same version of windows into a blank partition as windows setup should automatically install the correct keys.

However reinstalling windows is overkill and unnecessary as you can install the latest keys manually in only a few minutes. Microsoft has made available on github the latest updated secureboot keys and a script to install them. This guide will instruct on how to get and use them.

Before manually installing updated scureboot keys go into your UEFI setup, Make sure secureboot is enabled, and then clear the secureboot keys if you already have keys installed, putting Secure Boot into setup mode. Windows will boot when Secureboot is in setup mode, which is what we need to install updated keys. If Windows wont boot for you when Secure Boot is in Setup mode, this guide is not for you, something else is wrong.

Once in Windows, you need to download the latest edk2-x64-secureboot-binaries.zip file from https://github.com/microsoft/secureboot_objects/releases At the time of writing this guide (January 2026) the latest was v1.6.2 and was the version i used. Note the signed releases do not have the needed file you can only find it in the non signed releases. Extract the zip file into a new directory Once you have that file you need to download a powershell script from the secureboot_objects source tree https://github.com/microsoft/secureboot_objects/blob/v1.6.2/scripts/windows/InstallSecureBootKeys.ps1 Note you can’t download this file directly in a browser you need to view the link and then press the download raw file button or choose the download option in the overflow menu in the top right of the page. Download the file to the directory you extracted the zip file into

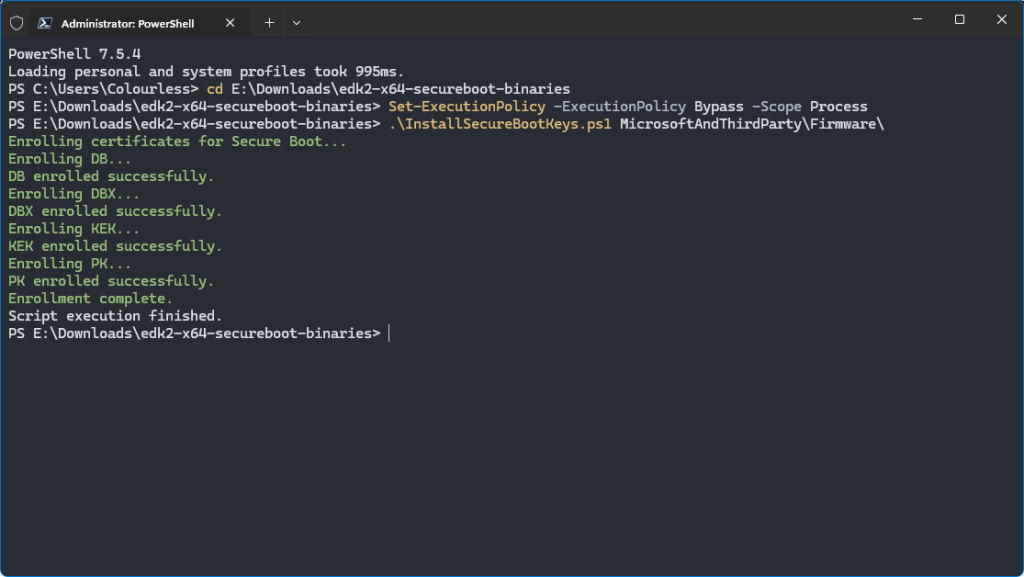
Once the powershell script is downloaded you’re now ready to install the keys. Start Powershell as an administrator and change to the directory you extracted the file and downloaded the script to. Run the following poweshell command to enable script execution for this session

Set-ExecutionPolicy -ExecutionPolicy Bypass -Scope Process

Now you can run the script and install the keys with the following command

.\InstallSecureBootKeys.ps1 MicrosoftAndThirdParty\Firmware\

If everything was done correctly you should see powershell output like the following:

The secure boot keys have been installed and you can now restart your computer. Installing the keys automatically switches SecureBoot into User mode and nothing else needs to be done. Windows should boot normally now with SecureBoot now fully enabled with the latest keys. You should not need to do this again unless you clear the keys as Windows is supposed to keep the Keys updated

Feb 282025
 

Normally this should be impossible as the two languages are too similar and they try to interpret each other’s code as if it was there own

However both have a preprocessor of sorts which should help solve this. C++ has a full preprocessor but Csharp only has limited preprocessor capabilities with no macro substitution that greatly limits things. The preprocessor differences actually makes things harder as the CSharp compiler will error on many valid C++ processor statements.

CSharp has an annoying requirement that any line that stats with a # must be valid preprocessor statements even if in inactive preprocessor blocks which means simple things like this following code fail when logic suggests it should work

#if __cplusplus

// C++ code goes here

#include <cstdint>
#include <string>
using std::string;

#else

//CSharp code goes here
using System.Text;
using System.Collections.Generic;

#endif

The Csharp will error on the #include lines even though they are in an inactive block because they start with a #. So is there a way to include a file in C++ without starting the line with a # ? Yes, there is A C++ preprocessor statement is allowed to have white-space in front of it. The problem is so do CSharp preprocessor statements, so adding spaces or tabs before the # wont hide the preprocessor statement from the CSharp compiler. However CSharp and C++ have different ideas on what counts as white space during preprocessing. A C++ compiler converts comments into white-space in the phase before it does the preprocessing. However the CSharp compiler does not . This means adding an inline c style comment before the # is allowed in C++ and still works as a preprocessor statement. However the CSharp compiler does not see it as a preprocessor statement at all and will ignore it if it is in an inactive block which means the following rewritten code from above works when compiled by the CSharp Compiler and a C++ compiler

#if __cplusplus

// C++ code goes here

/**/#include <cstdint>
/**/#include <string>
using std::string;

#else

//CSharp code goes here
using System.Text;
using System.Collections.Generic;

#endif

This works with the CSharp 13 compiler for .Net 9.0 and earlier versions. It might not work in future versions. I don’t suggest anyone use this for anything Serious but it is interesting to know that it can be done. The /**/# trick works for any problematic C++ preprocessor statement in an inactive block, So with careful coding you can have have a class in a .cs file work as a CSharp class and an inline c++ class if you #include the .cs file in a c++project.

Jul 012011
 

I was unhappy with the performance of our Drupal websites when using them logged in. We have a local test machine that is LAMP (Linux, Apahce, MySQL, PHP) and it was had page load times of over a second quicker than the production server that is WIMP (Windows, IIS, MySQL, PHP). While the machine are using different OS and Webservers that didn’t account for the issues. Using the Devel module it was telling me the MySQL queries were almost identical between the two machines but the page execution time was significantly slower on the production machine.

After using a profiling extension for PHP I tracked down the problem. PDO was taking over a second (!) to connect to the MySQL database on localhost. After much searching around it turns out the problem seems to be due to MySQL having issues with resolving names with IPv6 addresses. Windows Server 2008 R2 by default returns an IPv6 (::1) and IPv4 (127.0.0.1) address for localhost. In order to work around the issue I needed to add ‘127.0.0.1 localhost’ to the servers \Windows\System32\etc\hosts file. It should be noted for anyone else doing the same, make sure there is no IPv6 address for localhost in the hosts file either.

After making the change, database connections were instant and the performance of the sites improved considerably.

May 232011
 

After not being able to find a module that worked quite as we wanted, I created a simple Age Gate module for Drupal 7. This module very basic and has various hardcoded paths in it.

The module redirects all anonymous users to the agegate page and requires that they check the ‘Over 18’ checkbox before they can view content on the site. If they don’t check to box and press submit they get redirected to a page at the path ‘access-denied’ (this is the page we use on our site). The module is coded to allow non agegate access to logged in users, the ‘user/login’ page and the ‘access-denied’ page.

Download it here. Module is provided as is. Agegate Module for Drupal 7